Copyright© 2007-2019 by Matrox Electronic Systems Ltd. All rights reserved.
Contents
Zivid One with Matrox Design Assistant
Installing the Zivid One Software
Creating the Design Assistant Project
Zivid One with Matrox Design Assistant
This document will guide you through setting up to capture depth map images from your Zivid One into Matrox Design Assistant.
Design Assistant software triggers are supported, so the Zivid One can be triggered from the PLC using Quick Comm, or via a button in the interface, or a Trigger flowchart step.
Installing the Zivid One Software
· Zivid software is required to use the camera on its own and with Design Assistant. The latest version compatible with Design Assistant is 1.2.1 and can be downloaded at https://www.zivid.com/hubfs/softwarefiles/ZividSetup_1.2.1+6ca8e224-12.exe. This includes:
o Camera drivers
o Zivid Studio, an application which lets users configure the camera
o API which is required by DA
· Documentation is available at https://www.zivid.com/downloads#docs. It includes:
o Zivid Studio User Guide – this includes example settings for dark objects, shiny objects and coloured objects.
· Zivid requires OpenGL 3.0 and DirectX 11. Launching Zivid Studio or allocating the camera in Design Assistant on a PC that does not meet this (such as a 4Sight GPm) will result in an error message about this requirement. Details about GPU requirements can be found here: https://zivid.atlassian.net/wiki/spaces/ZividKB/pages/428084/GPU+Requirements
· The installation instructions provided in the camera's Quick User Guide should be followed.
· The PC must be rebooted after the installation of the Zivid One software.
Saving Settings
· The camera's settings should be adjusted with Zivid Studio first – the Zivid User Guide has recommendations for Iris and exposure settings as well as explanations of the filters.
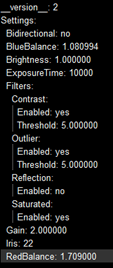
· The camera's settings are not persistent. To use the settings set in Zivid Studio in Design Assistant, these must be entered in the file ZividOneSettings.yaml (default location C:\ProgramData\Matrox Design Assistant\6.0\ThirdPartyCameras\ZividOne\1.2.1). It can be opened with any text editor. YAML editors are also available online. Only the values should be changed. The indentation and setting names should be left untouched. Below is the contents of the file:
· If the camera was allocated in DA while modifying the settings file, the camera will have to be freed and reallocated for the changes to take effect.
Creating the Design Assistant Project
Open DA X Version 1905
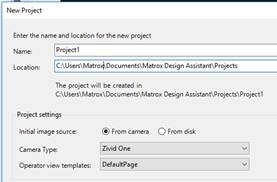
Create a new project, and specify the Zivid One camera type.
Connecting to the Zivid One
Unlike some other third party cameras, Zivid Studio and Design Assistant cannot both be connected at the same time. In Zivid Studio there are connect and disconnect buttons. In Design Assistant on the Platform Configuration dialog, PhysicalCamera1 page, there are Allocate and Free buttons.
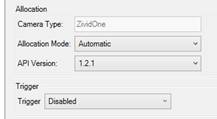
In Design Assistant's Platform Configuration, two allocation modes are available for the Zivid One:
· Automatic : DA allocates the first Zivid camera detected by the API.
· Hardware ID: Allocation value must be the camera's serial number, which can be found in Zivid Studio.
Configuring the Camera step
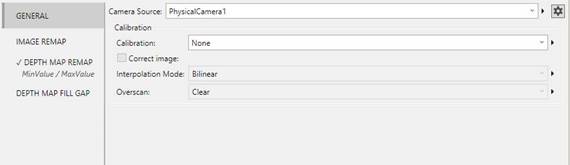
In the Camera step, verify that the Camera Source input is PhysicalCamera1.
Rerun the Camera step and click on the Send Trigger button in the Wait notification bar.
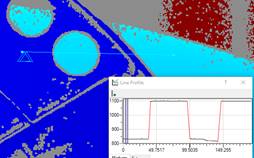
Setting Remap parameters
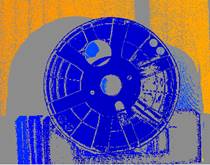
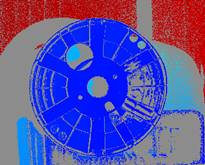
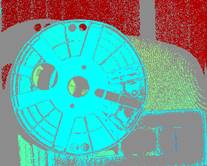
If your depth map image shows a range of colors from Blue to Red over your objects of interest, then the default mapping is suitable for your scan.
DesignAssistant will remap the depth map using the minimum and maximum values by default.
If successive images of a hardly moving object change colors, as shown below, there are probably small noise points that are significantly closer or farther than the rest of the scene. Setting the lower and upper limits of the remap slider will avoid such fluctuations.
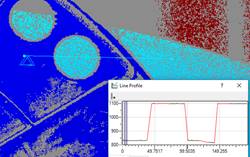
Setting Fill Gap parameters
Invalid pixels appear gray in Design Assistant depth maps when using a colormap. They appear black in the Zivid OneControl app.
In Design Assistant, you can replace some of the invalid pixel values with depths interpolated from neighboring pixels. You can choose to interpolate based on the size of the gaps, and on the height difference either side of the gap.
|
Without filling |
Filling 1 by 1 pixel gaps, with height difference less than 2 mm |
|
|
|
Using QuickComm
The trigger can be provided by the PLC directly using the Quick Comm PLCCamera1Trigger bit if you set the trigger target in the Platform Configuration page for EtherNet/IP or PROFINET.

Limitations
· Enabling the image remap feature in the Camera step will convert it to a one band unsigned 8-bit format. To keep a colored image, this feature must be disabled. We plan to support 3-band image remap in a future version.
· The Zivid API does not support HDR or other multi-frame modes from the .yaml settings file.